Showing posts with label drawing. Show all posts

Wednesday, June 8, 2016

Swirly Trees in chalk pastels @ WBCL

Oh wow the swirly trees turned out really good! I had the kids draw them first with lots of swirling branches then block them in with black crayon. Next made a dozen or twenty circles with white crayon then the COLOR. They got to choose their own chalk pastel colors and make dual colored dollops and grass. A couple of the kids who came in late are finishing their branches at home but good work.


Friday, January 29, 2016

Making furry groundhogs @ WBCL

Not your usual groundhog project! 

Using 1/4 page of construction paper we drew a fat little groundhog and then glued the 2 sides together with a stick in the middle. 
The kids were told they could cut him out or not--the real project was in making him furry. I had thin doll hair that most cut up then glued down to the groundhog. I also had some fur coat lining that others used. We added google eyes and a bead nose to finish them off. Pretty cute!!


Sunday, September 6, 2015

Labor Day illustrated @WBCL

Sometimes art is all about the story! We had a really fun drawing and coloring project Wed on Labor day. We talked about the day then used the copied page to accent the words and draw pictures of people working or activities for enjoying on labor day. We had fun drawing a pizza guy with a chef's hat and multiple swimming pools with tubes to ride in. Lots of sparkly starts to glue on too. — at Wells Branch Community Library.

Friday, June 12, 2015

Painting and drawing I—from traditional to modern


We started art camp off this summer with a trip back in time to visit ancient art, medieval arts and then moved onto the renaissance period and finally to more modern art in America. We started by looking at Egyptian and Greek pots then painting a story on a clay pot in only 1-2 colors. It is a bit of a challenge to limit the palette that much but they made it! 
We moved on to the medieval period and discussed lettering in bibles and important documents and how they were decorated by the scribes with scenes or items relevant to the person. We used wood blocks given to me by the HOTT tole painters group that we had primed in gold for the campers.

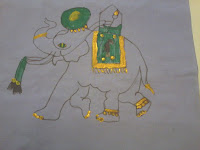
Our last project was a fabric painting of an ancient Indian elephant with a lot of gold trim. Because I wanted them to concentrate on drawing the details on the elephant and painting it, the pattern was on their fabric. 


2nd day we moved on to looking at and discussing impressionists, well known artists and pointillism. We started with a tape resist and did a finger painted Monet bridge in his garden. Some of them were not very comfortable with the finger painting only tapping but in the end most did pretty well. the magic was when we pulled the tape off. the oooh and aaahs!  
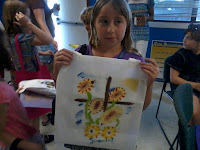
I pulled out a variety of cloth bags for them to chose from and we talked about Van Gough and his sunflowers. Everyone then got to draw and paint their bags. 


 Kat got to teach the last project today on pointillism using examples from Seurat. I had a variety of wood pieces and we had several different size items for them to dot with.


Our final day started with a Georgia O'Keefe type watercolor. We looked at a number of her paintings both of flowers and of other scenery. We drew the set of morning glories then did wet painting of them. Finally all the kids got how to add paint into the water on the paper and help it move instead of just painting  with the watery paints. Lots of oooh and aaahs on this too. We did a bit of salting at the end too. 

Kat got to lead the Chagall circus scene with the camp and probably got the kids to draw more intricate figures than ever. Yes there were monkeys hanging by their tails too.  The scenes were very detailed. We did colored pencils to complete this one.


Lastly we used an unknown artist as an example and did a very different technique with them. It is a tree with lights in it on a moonlight background. We used the four colors without cleaning our foam brush--scary to not wash your brush!! We then drew the tree in with lots of branches and did dot on dot for our lights. It was really quick and they did a fantastic job. Always goes too fast.

many more pictures at Painting and drawing I

Thursday, July 24, 2014

Draw a tiger @ WBCL

we again used the grid drawing method and the tigers were fantastic. the kids then colored them with pencils.


Wednesday, March 12, 2014

Colors across Texas day 2 art mini-camp

 We had so much fun and made such a MESS! We started looking at beaches and talking about them then each camper designed a beach scene on a 4" pot. They tried out snow-tex and all kinds of paint spreading and applying. Every pot was so different. 

We next kept to the beaches theme and drew and painted a sea shell on a small tote bag. They had small shells to hold and draw onto the bag then paint. The kids really got into the texture so it got on these too. 


Our last project was the bat bridge at sunset with chalk pastels. We drew our bridges and then layer out the way we wanted the sunset to look. Some of the campers got so involved with the pastels that the skies are surreal and the kids had as much chalk on them as the paper.  We spent a few minutes gluing our drawing of the Texas windmill we did yesterday. I am tired so they must be too.

Tuesday, March 11, 2014

Colors across Texas day 1 art mini-camp

We learned a bit about west Texas today and drew Monument rock to paint with thick acrylics. We used some texture paint and the kids learned to pounce in the background rocks using several colors randomly. They used pallet knives to paint the rock itself and the foreground sandy area. Some made theirs darker and some lighter but all were really good.
We also drew a cluster of cactus on watercolor paper to paint. The boys didn't want flowers on theirs but I think they put on the buds. I think most kids are not used to painting with water first then putting in the watery paints but have the "oh wow" reaction when they can see the paints move and mix. This one also turned out really good.


Thursday, January 30, 2014

Drawing and painting winter birds @WBCL


This was a draw along with me lesson (see drawing above) which worked very well last night. I get some fairly young kids in the class and have been doing more draw/paint sessions of late. They love it and they are pretty good at it. The parents do help with the drawings as needed but the kids hold their own. We also had colored reference pictures to consult when we painted the birds. I chose cardinals and jays because they have similar shapes but dramatically different colors. we even did a bit of color mixing and added a few details like sky or branches to them.

Thursday, January 23, 2014

I have a dream hands project @ WBCL

We started out with a bit of a history lesson about who Martin Luther King was and then I read part of his speech to the kids. I had made up a sample with the circle in the middle, printing I have a dream, three faces to color, and then a few of the colored hands in a circle around The edges. Some of the kids got very very detailed in their drawings and their colorings. We were fortunate to have a donation of people colored crayon to use for this project.

Drawing and Painting winter trees @ WBCL

Winter trees are always interesting to draw and paint. This is a project where I get the kids to follow along with me and then they embellish it on their own. We have many shrubs in our neighborhood that are covered with red berries in the winter time. We used a limited number of colors of paint for this and I had the kids draw the trees first then shade along the edge of the side of the tree and the branches and go back and paint them with the  lighter shade of brown add some leaves and then use the back end of the paintbrush to add the red berries.

Saturday, July 20, 2013

Chopping and slicing and making cinnamon mountains, veggie skeletons and egg critters @WB Annex


 This group is in love with the slice and dice moves. We set up our own slice and dice table with 3 dicers, 3 cutting boards, and a number of small knives. Little did we know that the slice and dice activity would be as popular (or more) than making the food projects. Thanks to neighbors for loaning us crinkle cutters this week. Pickles, cucumber and celery are so much more interesting if the edge is all crinkly. The pictures tell it all although the scrap crust cinnamon mountains were a real hit.

These are supper easy to make and take care of the bread crusts that so many kids want to throw out.
You need about 2 cups of crusts torn up into little pieces, 1/2 apple grates, about 1/3 cup water and cinnamon sugar for on top. Once we combine the first 3 ingredients we divided the dough into piles for each camper who formed them into a volcano shaped pile. The kids then sprinkled the top with a teaspoon or so of cinnamon sugar mix. We baked them about 15 min at 350.  One of the campers went home and fixed this desert for her family.
The group competed to make the best veggie skeleton then voted on each others and awarded most colorful, most variety and most unique. It was fun to see the skeleton families--including pets. Most of the skeletons didn't make it past judging as we are a hungry group. The egg critters were also fun and didn't last long. I got to take a couple home but from the egg monster with a carrot center to the egg under trees with 4 baby eggs to the bunny egg we had fun with our food.  We used a few cookbooks for kids from the library:  The international cookbook for kids, The kids' multicultural cookbook: food around the world, and a couple of mine including Pizza Art.

For all the pictures:
 Food art camp day 2
Food art camp day 3

Friday, July 12, 2013

Drawing dragons @WBCL

I was give some heavy Crayola paper with fluorescent markers by a neighbor earlier this year and thought we would use them on this project. Perfect! I had all the kids draw along with me to create their dragon on one side of the paper. Great drawings by all from the wings to nose to tail. Then we colored them in using the markers. The markers develop over time so they are not too bright or glowing in the first few minutes but when they get going -- wow--the design just shines.

Tuesday, June 18, 2013

Insects-bugs, butterflies, bees Day 1 @ WB MUD


Today started off raining but that did not phase our artists. We worked on a lot of different kinds of bugs--insects and arachnids--drawing them, gluing them, painting them and examining them. I was lucky over the last week to find a lot of different bugs to put into containers for camp. I know the kids get to look at pictures at school but there is something super fun about looking at real ones. Each camper was given a magnifying glass to use in examining the bugs--butterflies, moths, a moth chrysalis, a beetle, a pair of stink bugs, and a few clay bugs I made up yesterday. We also have a great supply of books from the library to look at and use for reference.
We spent time drawing several of the bugs--trying to make them realistic as possible. The littler campers did fingerprint bugs too. All of them made bug jars from spice jars and pompoms. we will use them this week to store the bugs we catch. We also fashioned bugs from plastic eggs and glitter foam sheets. Kids do like glitter, so much that the dragonflies got a good coat of glitter paint to customize them. Only 2 more days to go.

Tuesday, June 11, 2013

Drawing & Painting art camp is a hit @WB MUD


Today was fantastic in getting to know our campers and what they like to do with art. We started with some special paper and fluorescent markers to do our interpretation of Picasso's guitars from his musical period. The markers develop over an hour or two into very intense colors. We reviewed the drawings at the end of the day to many WOWs. Great variety of guitars from the group. We then switched to drawing and painting on a small fabric bag. Neighbors shared beautiful shells for camp so we had them on the tables as reference. It is harder to draw from a 3-D object than a flat picture. They then painted them with fabric paints and except for a few "baths" the projects came off without a hitch. Kids learned how to get just the look they wanted on their bags. Tomorrow we'll add small shells. Our last project was taking sheet music and drawing stories on it. I found this on Pinterest and have to love the Russian art movement producing them. The kids started on their folder covers and some free draw time plus a session of "draw with me" of a very fat fish with fins. Got in a bit of commercial and science about fish to boot.
Here are links to the facebook albums until I can finish the camp pages. We have had so much fun this week and are looking forward to the remaining weeks of art camp. Space is still open in all camps.  Painting & Drawing art camp day 1   Painting & drawing camp day 2    Painting & drawing day 3   

Friday, March 15, 2013

All about birds art mini camp day 3


 This final day of camp was a little chaotic. We had to start lots of projects at the same time in order to get them to dry and be able to complete them. We started today by reviewing some of the facts and information about birds and nesting birds in Texas. We talked about the packet we would make for the birds to use in building nests. We also reviewed examples of dozens of gourd birdhouses before they began their projects. The campers selected the colors that they wanted to use to paint their birdhouses. There were a variety of different sizes and shapes of gourds that my friend Shelley gave us for this camp. We were able to utilize the tops of egg cartons in order to not get paint all over our drawings on the table. Every camper did their own take on what they thought would attract birds to their birdhouse.

We did a crushed eggshell base for a hummingbird painting. Each of the students selected a drawing of a hummingbird, cut it out, and pasted it to a piece of foam core board. We then covered the picture with tacky glue and they pressed on eggshells so that they would have a crackled surface. We set this aside to dry then colored them with bright colored markers. This project did not turn out as well as I expected but the campers were happy.
We also covered our surface for the scratch out using either crayons or dark-colored oil pastels. To complete the project they scratched out what looked like twigs for the nest all around the outside and then used a palette knife to scrape out 3 to 5 eggs inside the nest. They then colored the eggs with blue or pink pastel.

At every point the campers wanted to get back and finish painting their birdhouses. The idea of letting them air dry if there was a hair dryer available was not an acceptable option.
The two remaining projects were first to create a nesting materials bag from the mesh vegetable bags that I've been collecting filled with short pieces of yarn and string. Each end was secured with twist ties so it can be refill and attached a pipe cleaner on the end so it could be hung out for the birds.

The final project was to create birdseed reefs or bird food wreaths for the students to hang out in their yards at home. For this we again follow the directions I used to create these in January. I found this on Pinterest and it worked out quite well. This time we used fluted yogurt cups as our container. I had lots of help mixing up the ingredients much like a science project and then the students helped each other fill their cups, pressed the mixture in tightly, and made a hole using a pencil so that it could be hung on a ribbon.
Lastly they removed all of the items from their three ring binder and transfer them to the gray folder that they had decorated during the week. We punched extra holes along the edges so that they could hang the bookmark from Jeanette Johnson and other items like the nest bag and note bird. When we do this again we will definitely include constructing a pocket on both the inside front and back of the folder so that loose items can be more easily secured.

bird camp day 3
Book list for the week:
1. Charming Handmade Clay crafts
2. Creative Stamping in Polymer Clay
3. Draw 50 birds
4. Essential origami
5. Hummingbirds: hovering in nature
6. Making books that fly, fold, wrap, hide, pop up, twist, and turn:
books for 
7. Paper Quilling for the First Time
8. Quilling for Scrapbooks & Cards

1. Backyard birds of Texas: how to identify and attract the top 25 birds
2. The birds of Texas
3. The book of North American owls
4. Hawks
5. Pink!

AD