
Showing posts with label wells branch. Show all posts
Showing posts with label wells branch. Show all posts
Thursday, July 14, 2016
Painting a blue horse @ WBCL
Thursday, April 28, 2016
Thursday, April 21, 2016
Creating Earth Day sculptures from recyclable materials @WBCL
 |
| Earth day sculptures from recyclable materials |
Earth day creativity was amazing. I took a couple of boxes of caps and rings and assorted plastic and cardboard shapes, set them out on the table and let the group go wild. Amazing diversity. Some had moving elements, some had special significance to the maker. Great way for parents and kids to create together.
Wednesday, March 9, 2016
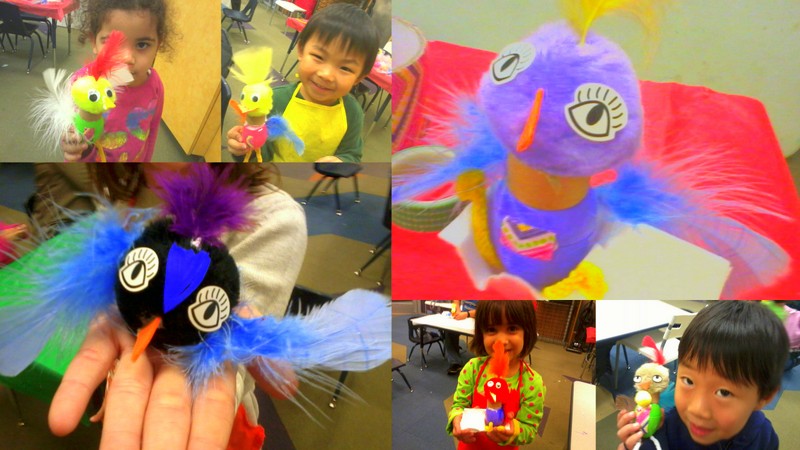
Making Crazy birds @WBCL
Thursday, October 15, 2015
Painting wolves with watercolor @WBCL
Last night we painted wolves in the Arts & crafts session. I found a nice picture of a pack of wolves that were not all snarling and printed it on watercolor paper. We did something a bit different by enhancing the lines with scribbles of black or brown color pencil then doing the watercolor using internet photos as a color reference. I would love to try this with watercolor pencils sometime but it really got everyone thinking of where to put their darker and lighter colors. Of course there are a few wolves of a different color and several of the older kids decided that a colored sky was essential.


Friday, September 18, 2015
Mariachis for Diez y Seis @WBCL
We talked a bit about the holiday and celebrations including music from the bands of mariachis. I precut the paper and used tubes that were thinner (nearer 1") than TP ones from my foodsaver rolls. The kids were really into this with 2 tables making members of the mariachi band complete with a dancer and a microphone to sing into. Even though each person was given the same basic pieces each one got a bit of a personalization as they added touches here and there.
The mariachis turned out SO good!!
Sunday, September 6, 2015
Labor Day illustrated @WBCL
Sometimes art is all about the story! We had a really fun drawing and coloring project Wed on Labor day. We talked about the day then used the copied page to accent the words and draw pictures of people working or activities for enjoying on labor day. We had fun drawing a pizza guy with a chef's hat and multiple swimming pools with tubes to ride in. Lots of sparkly starts to glue on too. — at Wells Branch Community Library.


Wednesday, July 15, 2015
Creating a super hero standout figure


With this week's theme of super heroes I thought we'd do something a bit different and create a 3D superhero launching itself out of a comic book page. We did not get real comics to cut up although I considered it. With this week's theme of super heroes I thought we'd do something a bit different and create a 3D superhero launching itself out of a comic book page. We did not get real comics to cut up although I considered it.
I found a coloring page with comic panes that we used as a base and colored it using markers and crayons. The kids then chose a super hero or two or three to color and cut out. I showed them how to make stands to make it look like the figure was popping out of the page.
 One of the kids kept saying "it makes it come to life" and it really does. The photos do not do the projects justice.
 Lots of batgirl and hackman figures, a couple of batman too. One of the kids did 4 then did not want to tape them down.


Or take a look at our video/slideshow of the figures coming to life~
Monday, April 13, 2015
Many spring projects and beyond
We have been doing so many fun things lately and my gardening has taken a tole on sharing.
 1-the bees turned out so well. Simple project using 1/2 wood egg, 2 wood hearts, a bead, a foam flower and a cork. They used markers to make the eggs yellow and sharpies to add detail. Thanks to my retired crafting friends for all the supplies.
 2-I had plastic eggs, mulit-colored grass, ice cream cups and some colored feathers donated to me. They cried out for something fun and this did the trick. We added pipe-cleaner ears, more feathers, eyes and pompoms to make chicks in a basket and bunnies on a paper ring collar. I cut little triangles for the beaks from some left over fun foam. What fun!
 3-We had a great time drawing and learning to paint a waterfall. I did one on the library wall in the story room over 12 years ago so we used it as our example. Everyone drew the pool of water and the rocks then painted them. We dribbled white paint on the edges and used toothpicks to create the moving water effect. You can see Ella standing in front of the waterfall on the wall in the pictures.
 4-One of my favorite art camp projects from spring break: Our jeweled guitars set off a shopping frenzy with all the fabulous donations we had to choose from. Every kid had a story to tell me about the items on it and why they were chosen. We used heavy primed canvas as a base and dabbed a bit of paint on then before mounting then. Thanks to Austin Creative Reuse, our Wells Branch neighbors, and Katherine Sands gma for supplies!

5-What would Mardi Gras be without masks? We used masks cut from fun foam then pulled out all the feathers, beads, and jewels to trick them out. everyone made their own bands to hold them on from pipe cleaners so they are adjustable.
2-I had plastic eggs, mulit-colored grass, ice cream cups and some colored feathers donated to me. They cried out for something fun and this did the trick. We added pipe-cleaner ears, more feathers, eyes and pompoms to make chicks in a basket and bunnies on a paper ring collar. I cut little triangles for the beaks from some left over fun foam. What fun!5-What would Mardi Gras be without masks? We used masks cut from fun foam then pulled out all the feathers, beads, and jewels to trick them out. everyone made their own bands to hold them on from pipe cleaners so they are adjustable.
Wednesday, August 27, 2014
making sunset silhouettes @WBCL
Silhouettes are great concepts for art but hard for little kids to gasp. Doing personal silhouettes with this group is also a bit more involved than I can do in a short class. Kids do get shadows though and went for it. We drew several designs on a 1/4 page of black construction paper. My example was a barn, person, fence and tree but they could do what they wanted and they did.

Thursday, August 14, 2014
Creating projects with beads and altoids tins @WBCL
I have such a stash of beads and people give me more plus I have been known to buy a bag here and there like the beautiful gold ones from Oriental Trading that doing a project with them is always a creative surprise. The kids and adults are told at the beginning that these are what ever has been thrown into the bag left from other projects so who knows what is there. I gave the tins a quick coat of flat paint then put out beads in bowls and plastic lids of Aleene's tacky glue. There was some trading between tables to get a specific bead here and there too. The results are really nice and it is easy for kids of any age to do this with help from an adult--some of whom did their own boxes.

Wednesday, June 11, 2014
Painted peacocks from real pictures @WBCL

We were so fortunate to have real pictures taken by local photographer Rob White to use as a reference for our painting of a peacock. First we drew the bottle shaped body and painted it with blue metallics. Then the fun began. I asked them to use their fingers to dab in the "eyes" on the feathers so they could paint the detail. Only had one objection so he did his with a brush. we put on plenty of eyes then detailed them, lastly connecting them to the body and adding the crown to the bird. We will be doing one of these at #art camp next week.
Squashed paper flags for Memorial day @WBCL

I keep trying to do something a little different to stretch the kids' (and parents) imaginations and skills while using the wonderful donated materials I continue to receive. For this project we used an A5 envelope and red & blue streamers. First they drew the American flag--yes it has 13 stripes and a square on the LEFT. they tore the streamers into pieces about 1 1/2" long and made piles of paper wads. They then dabbed on glue and squashed the paper wads into place. They were supposed to leave spaces in the blue are to represent stars--that was hard for some of them as they just would rather have had white to squash up. In all though it was a great time doing this one.
Tuesday, March 18, 2014
Using pastels to create a mountain at sunset @WBCL

Wednesday, March 12, 2014
Colors across Texas day 2 art mini-camp
 We had so much fun and made such a MESS! We started looking at beaches and talking about them then each camper designed a beach scene on a 4" pot. They tried out snow-tex and all kinds of paint spreading and applying. Every pot was so different.
  We next kept to the beaches theme and drew and painted a sea shell on a small tote bag. They had small shells to hold and draw onto the bag then paint. The kids really got into the texture so it got on these too.
Tuesday, March 11, 2014
Colors across Texas day 1 art mini-camp
We learned a bit about west Texas today and drew Monument rock to paint with thick acrylics. We used some texture paint and the kids learned to pounce in the background rocks using several colors randomly. They used pallet knives to paint the rock itself and the foreground sandy area. Some made theirs darker and some lighter but all were really good.
 We also drew a cluster of cactus on watercolor paper to paint. The boys didn't want flowers on theirs but I think they put on the buds. I think most kids are not used to painting with water first then putting in the watery paints but have the "oh wow" reaction when they can see the paints move and mix. This one also turned out really good.


Thursday, March 6, 2014
Making a Texas Star quilt square @WBCL

Quilting is all but a lost art for kids but a great way to discuss history for Texas's birthday and be creative too. I precut triangles before class and brought extra fabric for filler and examples of Texas Star quilts. This one is kind of a spinning star. I had the kids position the triangles first then glue them to a paper backing. They then selected other fabric in squares or triangles to fill the page. Some did borders too. Fun and easy way to get into this and I got tips from a mom who quilts when I flipped one of my triangles and got all tangled. We will try on sewing a square this summer I think.
Sunday, February 16, 2014
Making a Valentine's Day basket at WBCL

Wednesday, August 28, 2013
Learning to weave on a frame leaves no one behind @WBCL
 This is an adaptable project that just works better each time I bring it out. I used the plastic lids from tomato boxes as they had notches along the edges to use as pins to start the weaving. We talked about warp and woof and how we were going to do the project. Everyone got a long piece to set their warp and a needle and shorter pieces to do the weaving. A lot of "over and under" was mumbled as they got the piece going and could not wait to add the beads into the design. Some got a lot, some got just a few. All were removed from the frame and tied to hang complete with beaded fringe at the bottom.
Friday, August 16, 2013
Castles, princesses and knights take center stage @WBCL
 This was an expanded project from one I did before with the summer group. We used a boutique kleenex box and 2 paper towel tubes to make the structure for the castle. I supplied paper and glue while they did all the imagination part. I also put out tp tubes to make either a knight with foil armor or princess. What a great variety we got by the end of the time. There were drawbridges, turrets, and a pair of the prettiest princesses yet with paper dresses and crowns. Another fantastic recyling project.
Subscribe to:
Comments (Atom)