Showing posts with label kids Crafts. Show all posts
Showing posts with label kids Crafts. Show all posts
Wednesday, July 20, 2016
Art Camp still has a few spots for Juniors this summer
Quoting WB MUD Manager Matt: "You blew up skittles!" We made a fountain of suds and fizzing with vinegar, baking soda, and powder paints, placed inside out film canisters! 2 spots still open for this year's sciency art camp Aug 2-4. Call 512-251-9814 to enroll. Age 8-12


Wednesday, March 9, 2016
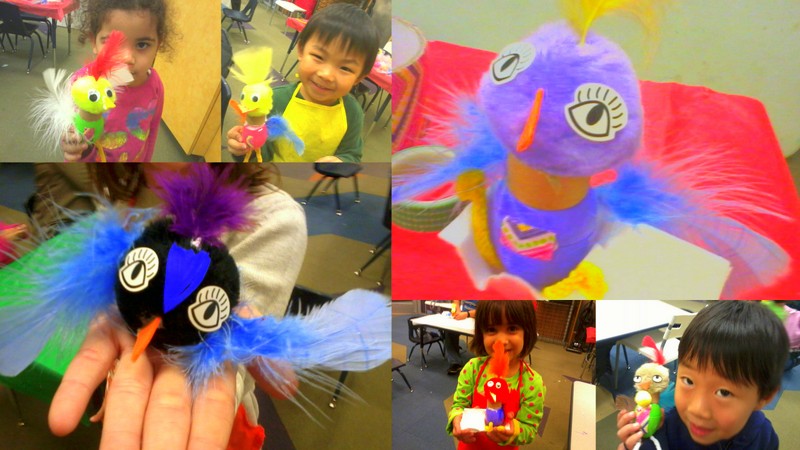
Making Crazy birds @WBCL
Wednesday, July 15, 2015
Creating a super hero standout figure


With this week's theme of super heroes I thought we'd do something a bit different and create a 3D superhero launching itself out of a comic book page. We did not get real comics to cut up although I considered it. With this week's theme of super heroes I thought we'd do something a bit different and create a 3D superhero launching itself out of a comic book page. We did not get real comics to cut up although I considered it.
I found a coloring page with comic panes that we used as a base and colored it using markers and crayons. The kids then chose a super hero or two or three to color and cut out. I showed them how to make stands to make it look like the figure was popping out of the page.
 One of the kids kept saying "it makes it come to life" and it really does. The photos do not do the projects justice.
 Lots of batgirl and hackman figures, a couple of batman too. One of the kids did 4 then did not want to tape them down.


Or take a look at our video/slideshow of the figures coming to life~
Monday, April 13, 2015
Many spring projects and beyond
We have been doing so many fun things lately and my gardening has taken a tole on sharing.
 1-the bees turned out so well. Simple project using 1/2 wood egg, 2 wood hearts, a bead, a foam flower and a cork. They used markers to make the eggs yellow and sharpies to add detail. Thanks to my retired crafting friends for all the supplies.
 2-I had plastic eggs, mulit-colored grass, ice cream cups and some colored feathers donated to me. They cried out for something fun and this did the trick. We added pipe-cleaner ears, more feathers, eyes and pompoms to make chicks in a basket and bunnies on a paper ring collar. I cut little triangles for the beaks from some left over fun foam. What fun!
 3-We had a great time drawing and learning to paint a waterfall. I did one on the library wall in the story room over 12 years ago so we used it as our example. Everyone drew the pool of water and the rocks then painted them. We dribbled white paint on the edges and used toothpicks to create the moving water effect. You can see Ella standing in front of the waterfall on the wall in the pictures.
 4-One of my favorite art camp projects from spring break: Our jeweled guitars set off a shopping frenzy with all the fabulous donations we had to choose from. Every kid had a story to tell me about the items on it and why they were chosen. We used heavy primed canvas as a base and dabbed a bit of paint on then before mounting then. Thanks to Austin Creative Reuse, our Wells Branch neighbors, and Katherine Sands gma for supplies!

5-What would Mardi Gras be without masks? We used masks cut from fun foam then pulled out all the feathers, beads, and jewels to trick them out. everyone made their own bands to hold them on from pipe cleaners so they are adjustable.
2-I had plastic eggs, mulit-colored grass, ice cream cups and some colored feathers donated to me. They cried out for something fun and this did the trick. We added pipe-cleaner ears, more feathers, eyes and pompoms to make chicks in a basket and bunnies on a paper ring collar. I cut little triangles for the beaks from some left over fun foam. What fun!5-What would Mardi Gras be without masks? We used masks cut from fun foam then pulled out all the feathers, beads, and jewels to trick them out. everyone made their own bands to hold them on from pipe cleaners so they are adjustable.
Thursday, August 14, 2014
Creating projects with beads and altoids tins @WBCL
I have such a stash of beads and people give me more plus I have been known to buy a bag here and there like the beautiful gold ones from Oriental Trading that doing a project with them is always a creative surprise. The kids and adults are told at the beginning that these are what ever has been thrown into the bag left from other projects so who knows what is there. I gave the tins a quick coat of flat paint then put out beads in bowls and plastic lids of Aleene's tacky glue. There was some trading between tables to get a specific bead here and there too. The results are really nice and it is easy for kids of any age to do this with help from an adult--some of whom did their own boxes.

Thursday, July 24, 2014
Stars & stripes or Patriotic fun mini-camp @ WB Annex
Finally a week where the 4th doesn't fall in the middle of the week so we grabbed it and did a camp. We started the week with a drawing session of a flagged street scene in the Picturing America series by Childe Hassam, an impressionist. The main feature of the week was construction of the 3 small floats from start to finish - one of Uncle Sam and one of Lady Liberty. Along the way we made flags, confetti eggs, tp poppers and long wands with stars. We capped the week off marching in the parade in Wells Branch.


Wednesday, June 11, 2014
Squashed paper flags for Memorial day @WBCL

I keep trying to do something a little different to stretch the kids' (and parents) imaginations and skills while using the wonderful donated materials I continue to receive. For this project we used an A5 envelope and red & blue streamers. First they drew the American flag--yes it has 13 stripes and a square on the LEFT. they tore the streamers into pieces about 1 1/2" long and made piles of paper wads. They then dabbed on glue and squashed the paper wads into place. They were supposed to leave spaces in the blue are to represent stars--that was hard for some of them as they just would rather have had white to squash up. In all though it was a great time doing this one.
Thursday, May 15, 2014
Creating pots @WBCL
OK so you get a pot and it has a sticky tag on it--no big deal...you get 20 of them and it is a pain so planning an alternate project turned out better than the original and involved a lot more design work on the part of the participants. I took some fabric from my stash that had small squares of sunflowers, trees, lambs, chickens, cows, beehives, apples, and more and cut them into the squares. We decoupaged them onto the pots with Aleene's glue learning the "glue goes under then over" process. The kids then added buttons and did a bit of finish with outdoor scribble paint. Anyone would love to use these distinctive pots!

Sunday, February 16, 2014
Making a Valentine's Day basket at WBCL

Sunday, February 9, 2014
Blue horse collage for Chinese New Year

Thursday, January 23, 2014
I have a dream hands project @ WBCL
 We started out with a bit of a history lesson about who Martin Luther King was and then I read part of his speech to the kids. I had made up a sample with the circle in the middle, printing I have a dream, three faces to color, and then a few of the colored hands in a circle around The edges. Some of the kids got very very detailed in their drawings and their colorings. We were fortunate to have a donation of people colored crayon to use for this project.
Making jewelry takes a bit of beads and more

December crafts candles and luminaries

We used crystal light containers to create luminaries that would be able to use battery-operated candle lights. I had the kids gluon torn pieces of tissue paper all over the outside of the plastic containers. We then took them outside and inserted the candle lights in them to test them out. Looks like real stained-glass.

Ornament making sessions get at the creativity


Thursday, October 31, 2013
Spiders and their webs @ WBCL

Coming right after the spider guy presentation on Saturday, this seemed like a great project todo. I had a large stash of wooden beads that I sprayed black and inserted a small dowel into the hole. I made up two samples of these so that the kids could see how these spiders were assembled. Generally their skills at twisting the chenille stems are hardly equal to the task, but this time almost everybody got their spiders legs on with no difficulty. we used a touch of glue you add a tiny pom-pom at the front where the mouth would be. We also added wiggly eyes to finish the spiders. Some of the kids decided that the large body was the spiders head and put the eyes there. for the spider web we cut sheets of black card stock diagonally then had the kids pencil in the lines of the web. Many of the kids added bugs for the spider. Some said that they didn't like the spiderweb I did and instead had very curvy lines for their web. Guess the spider gets to go where he wants to go.
Thursday, September 19, 2013
Making piñata for Diez y seis de Septiembre @WBCL
 This project was just a little complicated but everybody was able to complete it with very little difficulty. We began with quart milk cartons and cut the bottoms off. I cut all of the lengths of tissue paper in advance and had the kids cut their own fringes from the long strips. They first had to glue squarish pieces across the bottom of the carton. We then added layer after layer of fringes until we got up to the top. We opened the top of the carton and punched holes on both sides to insert a cord as a hanger. Most of the kids continued their fringe up to the very top of the cart. We then added a bit of streamers to the bottom and sent them home to fill it with prizes or candies or whatever they wanted. We had a discussion about how to break the piñata to have the items fall out. We also had a discussion about Mexican Independence Day.
Friday, September 13, 2013
Jewelry making from recycled materials @WBCL
I saw the ring making project on Pinterest earlier this year and put the call out to the neighborhood and the parents in this class to save the little ring pulls from cardboard drink and milk boxes. Finally we had enough to do our project. In order to be sure that our sequins and jewels would stick to the plastic I gave each one a quick sanding. We used Alenes tacky glue then added sequins, beads, and big gemstones from a donation. I also had some fun foam bookmarks that I thought would be ideal as bracelets. We were not disappointed. I little Velcro on the ends then the kids covered the entire top with a variety of sequins and beads. Everyone went home wearing their creations. This was a great project as any age of child could do this with a little help from mom or dad.

Subscribe to:
Posts (Atom)